NOTE: In my last post a question was asked what did I mean by left facing and right facing pages, basically this a printing term used for a book or publication, it just indicates that these two pages would go side by. This is termed as a spread see here for definition.

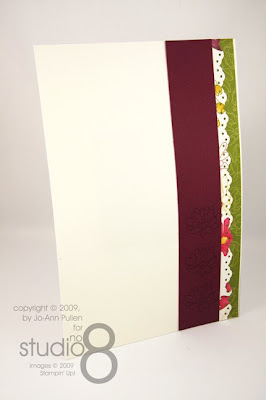
Today I thought I would spice it up and do something different. I love things that can be removed or things that allow you to add things too. So for this one I created a pocket again very simple and a tag that can be removed. The tag tucks into the pocket and until you remove it you don’t see the pretty flowers at the bottom. Sort of like a wonderful surprise. For the right side I did something very simple, for this one you can either add a picture or journal or both. What every you want.
Left Facing Page and Close-up


Right Facing Page and Close-up


Recipe for Page 5 (left facing page):
Supplies:
Paper: Whisper White card stock, Rich Razzleberry card stock, Old Olive card stock, DSP Lovely Flowers
Ink (all classic): Old Olive, Rich Razzleberry, Melon Mambo, and Crushed Curry
Stamp Sets: Flower Lines Stamp Artwork, Warm Words
Misc: Taffeta Ribbon Whisper White, 3/16” Corner Rounder, Horizontal Slot, Scalloped Edge Punch, Blender Pens and Rich Razzleberry Stampin' Write Marker
Paper Size:
Whisper White (all pages) 6 w x 9 h plus 3.5 w x 5.5 h (tag)
Rich Razzleberry 6 w x 2.25 h plus 6 w x .24 h
Old Olive 4 w x 6 h (tag)
DSP Lovely Flowers 2 x 6 (flowers) plus 6 w x 4 h (green flowers)
What I did:
- Take Old Olive 4 w x 6 h (tag) and using the corner rounder punch three corners leaving the bottom right alone.
- Take the Whisper White 3.5 w x 5.5 h (tag) and do the same as above.
- Using the flower stamp, stamp three flowers using Rich Razzleberry, Melon Mambo, and Crushed Curry let dry.
- Using the blender pens remembering to work from the inside out – dark to light to give each flower shape and form.
- Stamp at the top (remember that you will be punching a slot at the top to add the ribbon so make sure you don’t stamp to high) using one of the stamps from Warm Words using Old Olive Classic Ink.
- Take Rich Razzleberry Stampin' Write Marker and create fake stitching all around except where flowers are. (see sample)
- Assemble both pieces and using the horizontal slot punch through both pieces of card stock and add ribbon.
- Take DSP Lovely Flowers 6 w x 4 h (green flowers) and punch one of the wide sides using the scalloped edge punch.
- Add to Whisper White (all pages) 6 w x 9 h leaving approx .25” of whisper white at the bottom.
- Adhere the DSP Lovely Flowers 2 x 6 (flowers) to the Rich Razzleberry 6 w x 2.25 h.
- Assemble the last two pieces as per picture.
Recipe for Page 6 (right facing page):
Supplies:
Paper: Whisper White card stock, Rich Razzleberry card stock, DSP Lovely Flowers
Ink (all classic): Razzleberry
Stamp Sets: Flower Lines Stamp Artwork
Misc: Eyelet Boarder Punch
Paper Size:
Whisper White (all pages) 6 w x 9 h
Rich Razzleberry 1.5 w x 9 h
DSP Lovely Flowers 2 w x 9 h (flowers) plus 2.5 w x 9 h (green flowers)
What I did:
- Take Rich Razzleberry 1.5 w x 9 h and using one of the flowers stamps and Rich Razzleberry Classic Ink stamp three flowers at the bottom.
- Take the DSP Lovely Flowers 2 w x 9 h (flowers) and using the Eyelet Boarder Punch, punch along one of the longest side.
- Adhere the DSP Lovely Flowers 2.5 w x 9 h (green flowers) to the Whisper White (all pages) 6 w x 9 h.
- Assemble the last two pieces as per picture.
Day 3 complete.

No comments:
Post a Comment